Learning how to drill into stucco wall correctly is a skill that every homeowner should master. Whether you are installing a new mailbox, mounting security cameras, hanging heavy hose reels, or putting up decorative house numbers, you will eventually face the challenge of drilling into your home’s exterior.
However, stucco is not like wood or drywall. It is a rock-hard mixture of cement, sand, and lime that is notoriously brittle. One wrong move, or using the wrong type of drill bit, can result in ugly cracks that are difficult to patch. Furthermore, if you don’t seal the holes correctly, you invite moisture into your walls, leading to expensive mold and rot damage.
In this comprehensive guide, I will walk you through everything you need to know. We will cover the difference between traditional stucco and synthetic stucco (EIFS), the essential tools you need, and a foolproof step-by-step process to drill safely in 2025.
Table of Contents
What is Stucco and Why is it Hard to Drill?
Before you pull the trigger on your drill, you need to understand the material. Traditional stucco is essentially a thin layer of concrete. It is applied over a wire mesh (lath) and building paper, usually covering a wooden frame.
Because it contains sand and aggregate, stucco is extremely abrasive.
- The Challenge: If you use a standard high-speed steel (HSS) drill bit designed for wood or metal, the stucco will grind the sharp edges of the bit dull in a matter of seconds.
- The Risk: Pushing a dull bit into stucco builds up heat and vibration, which causes the brittle surface to spiderweb or crack.
Hard Coat vs. Synthetic Stucco (EIFS)
It is crucial to know which type you have before learning how to drill into stucco wall:
- Traditional (Hard Coat): Feels solid like rock when you tap it. It is usually about 7/8 inch thick. You need a masonry bit and often a hammer drill for this.
- Synthetic (EIFS): Feels a bit hollow or plastic-like when tapped. It has a foam insulation layer underneath. You must be careful not to crush the foam layer when tightening screws.
Essential Tools You Need for the Job
You cannot do this job with a cheap drill and a random bit from your kitchen drawer. To ensure success, gather these specific tools:
1. The Right Drill: Hammer Drill vs. Regular Drill
- Hammer Drill (Best Choice): A hammer drill combines rotary motion with a pulsating “hammering” action. This pulverizes the concrete while drilling, making the job 80% faster and safer.
- Recommendation: If you have more than 3-4 holes to drill, use a hammer drill.
- Regular Rotary Drill: You can use a standard drill for traditional stucco, but it requires more patience and a very sharp masonry bit.
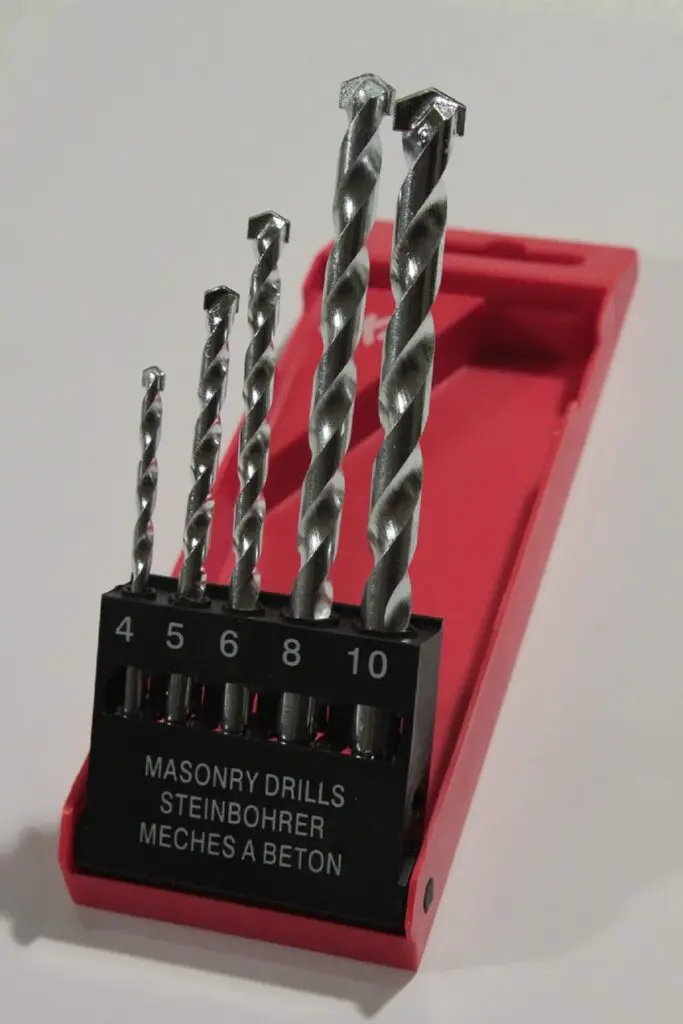
2. Carbide-Tipped Masonry Bits
This is the most important item. You need a drill bit specifically designed for concrete and stone.
- Look for: A bit with a wide, arrow-shaped head made of Carbide.
- Avoid: Black oxide or gold-colored titanium bits meant for wood/metal.
Check out the [Best Carbide Tipped Masonry Drill Bit Set] on Amazon.
3. Anchors and Fasteners
Stucco itself cannot hold a screw thread. It will crumble. You need anchors:
- Plastic Expansion Anchors: Good for light items (under 10 lbs) like cameras or thermometers.
- Toggle Bolts: Best for heavy items (over 20 lbs) if you can’t find a stud.
- Tapcon Screws: Concrete screws that cut their own threads (for heavy-duty use).
4. Safety Gear
Drilling concrete produces silica dust, which is hazardous to your lungs.
- N95 Dust Mask: Essential.
- Safety Glasses: To protect eyes from flying concrete chips.
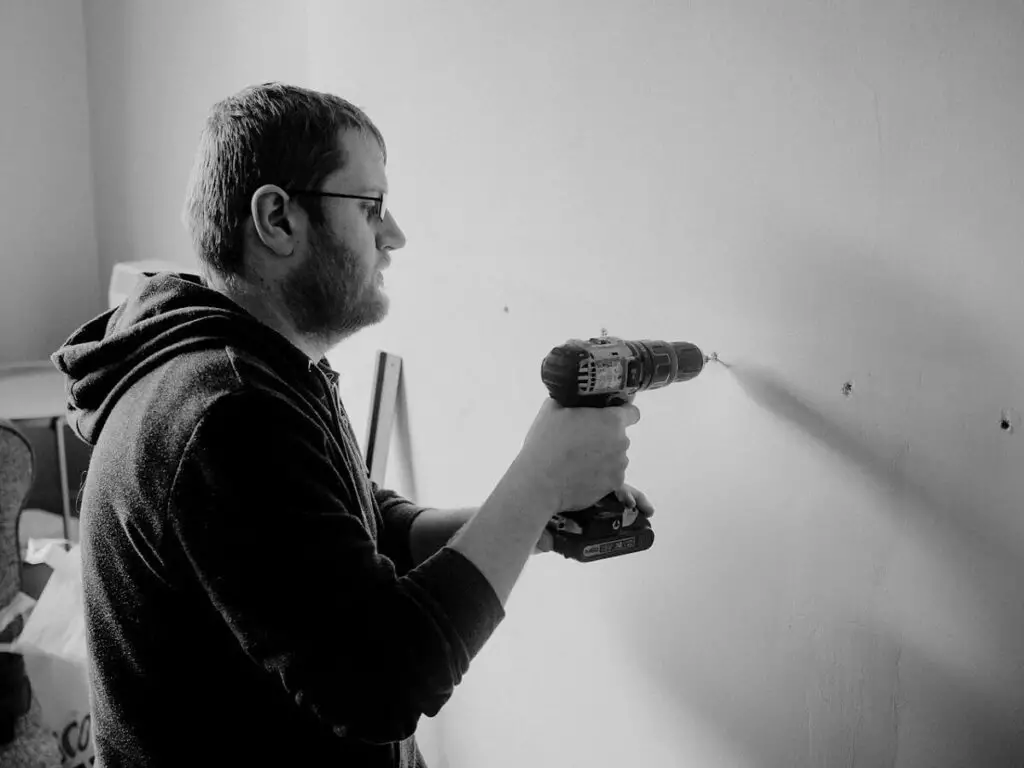
How to Drill Into Stucco Wall: Step-by-Step Instructions
Follow this detailed process to minimize the risk of cracking.
Step 1: Locate the Studs (Crucial for Heavy Loads)
If you are hanging something heavy like a hose reel, a large light fixture, or a heavy shelf, do not trust the stucco to hold the weight. You must drill through the stucco and into the wooden stud behind it.
- How to find it: Stucco makes stud finders act weird. Look for vertical rows of nails in the eaves or base of the wall. Alternatively, use a strong magnet to find the wire lath nails attached to the studs.
Step 2: Mark and Prep the Hole
Stucco has a bumpy texture. A spinning drill bit will “walk” (slide around) before it digs in, ruining your paint.
- Tape it: Place a piece of Masking Tape or Painter’s Tape over the spot.
- Mark it: Draw your “X” on the tape.
- Punch it: Use a center punch, an awl, or a concrete nail to gently tap a divot (small dent) into the center of the X. This gives the drill bit a “seat” to start in.
Step 3: Start Drilling (The Technique)
- Set the Depth: If using an anchor, measure the length of the anchor against the drill bit and wrap a piece of tape around the bit to mark the depth. You don’t want to drill too deep into the insulation.
- Go Slow: Place the bit in the divot. Start the drill at the slowest speed possible. Do not push hard yet.
- Engage: Once the bit has created a small crater, you can increase the speed.
- Steady Pressure: Apply firm, steady pressure. If using a hammer drill, let the tool do the work—don’t lean your whole body weight onto it.
- Cooling: If drilling deep, pull the bit out every 10-15 seconds to clear the dust and let the bit cool down. Overheating kills drill bits.
Step 4: Clean the Hole
Once you reach the desired depth, pull the bit out while it is still spinning. Use a can of compressed air or a turkey baster to blow the concrete dust out of the hole. If you leave the dust, the anchor won’t grip properly.
Step 5: Waterproofing (Don’t Skip This!)
This is vital. A hole in your stucco is a gateway for rainwater to enter your walls and rot the wooden framing.
- The Fix: Before inserting the anchor, squeeze a generous amount of Exterior Grade Silicone Caulk into the hole.
- The Seal: When you push the anchor or screw in, the silicone will ooze out slightly, creating a watertight seal around the threads. Wipe away the excess.
How to Choose the Right Stucco Anchor (Deep Dive)
Learning how to drill into stucco wall is only half the battle. Once the hole is drilled, you need something that will actually hold your screw. Stucco is crumbly, so a regular wood screw will just spin and fall out. Choosing the right anchor depends entirely on the weight of the object you are hanging.
Here is a detailed breakdown of which anchor to use for your specific project in 2025:
1. Light Loads (Under 10 lbs)
For lightweight items like thermometers, small motion sensor lights, or decorative house numbers, a standard Plastic Expansion Anchor is sufficient.
- How it works: As you drive the screw in, the plastic splits and presses against the sides of the stucco hole.
- Installation Tip: Drill a hole slightly smaller than the anchor for a tight fit. Tap it in gently with a hammer.
2. Medium Loads (10 to 30 lbs)
If you are hanging a mailbox, a large planter, or a security camera floodlight, do not trust plastic plugs. Use Toggle Bolts (Butterfly Anchors).
- Why use them: Stucco often has a hollow space behind it (between the lath and the insulation). A toggle bolt has wings that open up inside the wall, bracing against the back of the stucco mesh. This provides a much stronger hold than friction alone.
3. Heavy Loads (Over 30 lbs)
For heavy hose reels, retractable awnings, or large shelving units, you have two options:
- Option A (Best): Drill through the stucco and anchor directly into a wood stud using a 3-inch exterior deck screw or lag bolt. This is the only way to guarantee it won’t rip off the wall.
- Option B (Alternative): If no stud is available, use Tapcon Concrete Screws. These are blue screws designed to cut their own threads into masonry. They require a specific drill bit size (usually included in the box).
How to Repair Stucco If It Cracks (Emergency Guide)
Even with the best technique on how to drill into stucco wall, accidents happen. Old stucco can be unpredictable. If you notice a hairline crack spreading from your drill hole, don’t panic. You can fix it easily without calling a pro.
Step-by-Step Repair Process
- Clean the Crack: Use a wire brush to gently remove any loose debris or crumbling sand from the crack.
- Buy the Right Patch: Go to the hardware store and buy a tube of “Stucco Patch” or “Textured Acrylic Caulk.” Do not use regular smooth caulk, as it will look shiny and fake.
- Fill and Texture: Squeeze the patch into the crack. Then, take a rough sponge or a stiff paintbrush and dab (don’t wipe) the wet patch. This mimics the sandy texture of the surrounding wall.
- Paint: Once it dries (usually 24 hours), dab a little matching exterior paint over it. The crack will virtually disappear.
Common Mistakes to Avoid When Drilling Stucco
Even experienced DIYers make mistakes when learning how to drill into stucco wall.
- Using a Dull Bit: If you see smoke or the drill isn’t moving forward, your bit is dull. Swap it for a new masonry bit immediately.
- Drilling Too Fast: High speed creates heat, which can damage the bit and the wall. Pulse the trigger to keep it cool.
- Ignoring Wires: If you hit something hard that sounds metallic, STOP. You may have hit a nail plate protecting electrical wiring or plumbing.
Frequently Asked Questions (FAQ)
Can I use a regular drill for stucco?
Yes, for 1 or 2 small holes (less than ¼ inch), a regular drill with a sharp carbide bit works fine. For larger projects, a hammer drill is highly recommended.
Do I need a special drill bit for stucco?
Yes. Standard “Twist” bits for wood or metal will not work. You need a Carbide-Tipped Masonry Bit.
How much weight can a stucco anchor hold?
A plastic anchor in stucco can usually hold 5-10 lbs securely. For anything heavier, you should use a toggle bolt (holds 50+ lbs) or drill directly into a wood stud.
Conclusion
Drilling into stucco wall requires a bit more preparation than drilling into drywall, but it is a manageable DIY project. By choosing the right masonry bit, using the tape trick to prevent slipping, and properly sealing your holes with silicone, you can achieve professional results.
Now that you know how to drill into stucco wall safely, you are ready to tackle your next home improvement project.